
Continued from Page 4
OK, so the Ecotrons installation manual says if your bike has a vacuum actuated petcock, then you have to get rid of that. That type of petcock is a safety feature that allows the flow of fuel from the tank only when the engine produces vacuum, or in other words when it is running. On a conventional carburetor system, there's enough fuel in the line to start the bike, and once it's running the vaccuum from the engine moves the diaphragm inside the petcock and pulls on a needle to allow fuel to flow. If the line from the tank to the carb is cut for some reason, the engine stops and the petcock shuts off automatically because the engine doesn't produce vacuum anymore. On a fuel injected bike, there is a fuel pump that is controlled by the ECU. It has to be able to build up pressure in the line before the injector is allowed to do its thing, so it needs to pump fuel for a few seconds before the engine can start.
And like many bikes of that era, the Riva 180 has such a safety feature, so the petcock has to go!!! For some time I toyed with the idea of keeping the petcock but removing the diaphragm in the original petcock and drilling open the port that blocks the fuel flow. But you also have to have a second port on the gas tank in order to return the excess fuel that the injector did not use to the tank. So in the end, looking at the petcock and thinking that was not an elegant solution, I decided to fabricate a plate that would bolt on the tank where the petcock used to be.
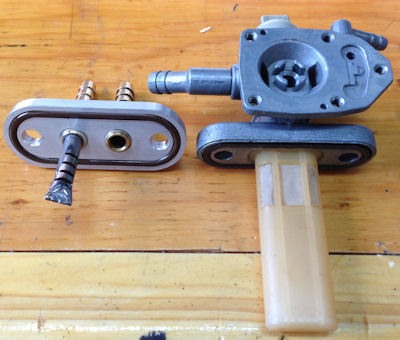
This is the Riva 180 petcock, showing the diaphragm inside of it that allows or blocks the flow of fuel. The nipple to the left went to the carb, and the one to the right brings vacuum from the engine.

And this is the new plate that was made on a computer driven lathe by another one of my cousins. We used hose nipples that I found at the local hardware store, and a viton #131 o-ring that's impervious to fuel. The steel pipe diffuser is a 1/4" brake line soldered in the fitting, and I cut slots all around it so the returning fuel doesn't splash all over inside the fuel tank.
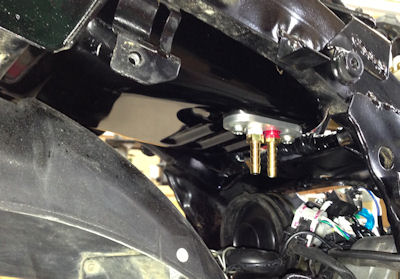
This is the fuel tank with the new plate installed, and in place on the frame. Note that I marked the two fittings with nail polish to differentiate them. Red for supply, and white for return.
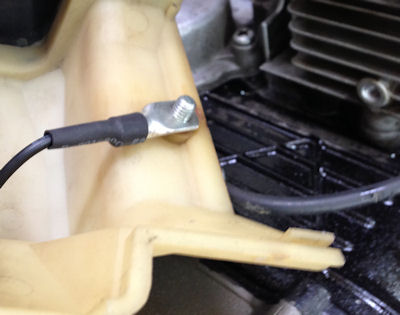
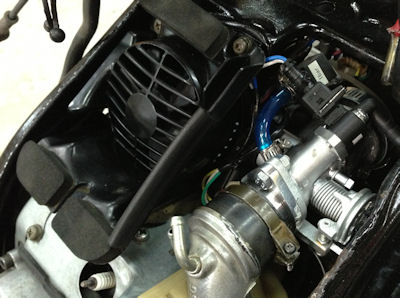
Now we need to continue the conversion by installing the harness. First there's the engine temperature sensor. Ecotrons says you have to install it on the head somewhere where it's protected from the relative wind that cools the engine when the scooter is moving so the temperature reading is more reliable. That usually means on the back of the engine where it's protected from the airflow. But on the Riva, there's a fan shroud that cools the back of the engine, and of course the front of the engine is facing the relative wind when it's going forward. In the end I decided to put the sensor on the far side of the engine from the fan, under the shroud where the bimetal valve used to be. I figured if the engineers at Yamaha thought that was a good place to measure the engine temperature, why argue with them. But then again they are the one who put that Godzilla carburetor on the Riva in the first place...
So the three following pics show the temp sensor installation.

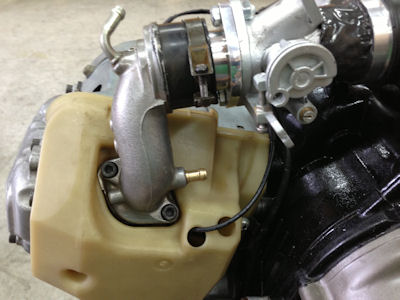
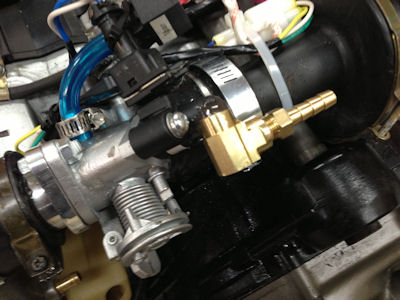
After that comes the manifold absolute pressure sensor (or MAP sensor) and there's a port on the throttle body just for that. I used a 2 inch length of blue plastic hose and two collars that came with the kit, and zip-tied it on the connector for the injector (blue and white wires) so it doesn't move around with every bump on the road.

It's hard to see on this picture, but the throttle position sensor that comes already mounted on the throttle body is just a little too wide and it rubs against the carburetor cooling fan. This is because the throttle body moves with the engine and the fan is fixed on the frame. I was going to keep the fan but I realised it was there to cool the Godzilla carb in order to prevent vapor lock. With a throttle body I think there's no chance this is going to happen because there's no fuel bowl, so the engine shouldn't be able to warm the fuel quickly enough. Also, there's a fuel pump that feeds the carb and returns a lot of fuel to the tank continuously. Then I live in northern Quebec, it's not like I am going to ride this thing in Arizona. And finally the temperature sensor that drove the fan was mounted under the bowl on the carb, so without a carb I have no way of controlling the fan.
Next problem is that the tip of the hose connector on the injector clears the frame by less than 1/4". Since the injector moves with the engine when the scooter hits a bump, the hose would rub against the frame and wear down quite fast, or possibly this could break the plastic housing of the injector in case of a major bump. The injector can't really be rotated on the throttle body, and the trottle body can't be rotated enough to clear the frame.
So what I did is I bought a 1/8" NPT 90° brass elbow at the hardware store. Then I I cut the nipple on the injector by about half, being careful not to get any filings and shavings in the injector. Using a hobby knife I also removed the barbs on the nipple until the brass elbow fit a little loosely on the modified nipple. Using some JB Weld Quick, I glued the elbow on the nipple, making sure to clean both parts with rubbing alcohol beforehand.

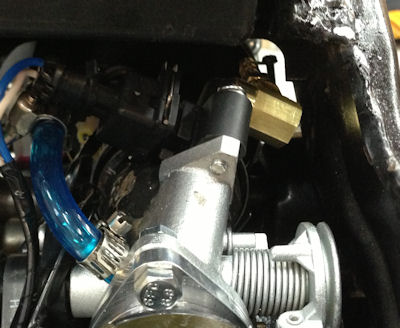
This is the modified injector back on the throttle body with the new nipple pointing to the rear, toward the airbox.
And the powertrain back under the frame. I am getting real good at removing and putting back the frame onto the powertrain.
Continued on Page 6